FM Bass Tutorial: Unterschied zwischen den Versionen
KKeine Bearbeitungszusammenfassung |
KKeine Bearbeitungszusammenfassung |
||
| Zeile 1: | Zeile 1: | ||
[[Category:Tricks]] | [[Category:Tricks]]how to make basses with 4 [[OP]] [[FM]] like [[Ableton]] Live [[Operator]], Yamaha DX Series.. | ||
how to make basses with 4 [[OP]] [[FM]] like [[Ableton]] Live [[Operator]], Yamaha DX Series.. | |||
=Creating Bass Sounds with FM by Moogulator= | =Creating Bass Sounds with FM by Moogulator= | ||
Version vom 26. November 2007, 20:08 Uhr
how to make basses with 4 OP FM like Ableton Live Operator, Yamaha DX Series..
Creating Bass Sounds with FM by Moogulator
TUTORIAL for Operator for Ableton Live 4.1 or higher and other FM Synthesizers like DX / TG (by Yamaha)
- Ableton Live Info Link: http://www.sequencer.de/syns/ableton/Live.html
this lesson should explain that it is quite easy to use FM. Operator makes it easier than what is said about FM. let's start to make some bass patches and learn how to do it in this lesson. No matter if it's an acoustic bass or some fancy synth bass lines you want to create.
start 1
Let's start from the initialized sound which is a sine wave. A sine wave has only one tone with no overtones or high harmonics. A bass or electric bass has sonically not too many of them but it is indeed more complex than just a sinewave.
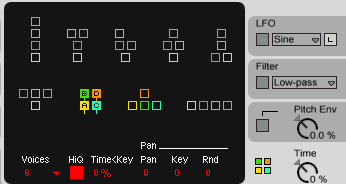
now concentrate on a "pair" of 2 oscillators and their results first, one oscillator (B) modulates the frequency of the one below it (A). Set all coarse frequency knobs of oscillator A and B to 0, it's the lowest you can get - you could start from 1 as well and transpose the overall patch pitch down one octave. Take this algorithm to start with, the algorithm shows the way the oscillators can influence each other, you find it on the bottom right after you have clicked the grey field - choose this one:
Operator FM Bass patch Ableton live why? there are two independent branches, that can be used for beefing the sound up a bit later.
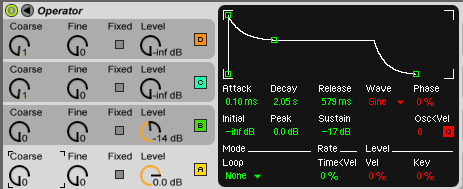
Oscillator B's level to around -14dB. You will hear a static e-bass spectrum. not bad. Play with level and coarse frequencies (Osc. B) to get an idea of how the spectrum changes. the higher, the more "small bellish" it gets. put it back to 0 after all.
more percussive 2
to get it into a percussive shape you need to adjust the envelopes. since you are now using 2 Oscillators note that Oscillator A is the fundamental volume of the overall sound and the modulating oscillator B changes the timbre/sound colour!
the envelopes change the volume of each Oscillator over time, so if you want this to happen for the volume click somewhere on the grey area of oscillator A and it will turn brighter and here you can see controls for Oscillator A volume: the envelope changes the volume over time. The decay time should be short, the sustain level should be smaller after the decay time has passed. You can experiment with the modulating envelope to change the sound dynamically: the graphical interface will give you an idea, what shape the volume will follow. play on the keyboards low notes and move the little green handles and hear what's happening. note that Attack, Decay and Release are all setting durations and the levels are Initial, Peak and Sustain. to hear the effect of Decay you need to lower the Sustain level.
Here is an example how it could be, lets set it like this - if you make the decay longer, it will take too much time to fall back to the Sustain level: Operator FM Bass patch Ableton live The envelope of Oscillator B can chance the sound timbre , so keep the volume envelope "longer" (raise "Decay") to hear the effect, again click on the Oscillator B (shown in light grey here) and you can change it's "way" over time also play around with it like on the volume envelope above. since this is the key of changing the sound itself think of the envelope as a contour shaper. You can set the time it needs to reach the maximum peak level (Attack) and hear the changing timbre. In fact it still modulated the Oscillators Level, but since it is the one that also modulates the frequency of Oscillator B it will change the timbre related to the Coards frequency ratio between both oscillators! So forming the sound happening HERE and this envelope will be the movement of the timbre over time.
Back to the bass patch it should look like this:
Operator FM Bass patch Ableton live Here it is: a simple E-Bass! Play on the lower 2 octaves on the keyboard.
It's not big enough? Here's a trick to fatten it up: Crank up "spread" to have a broader wider sound impression (not necessary, but check out what sound good to your ears). Now copy what you did to Oscillators A and B in the first "branch" of our algorithm: Play with the frequencies (coarse and fine) of Oscillator C and D, and hear: there are two sounds in one now! So you could model some "string like plucked sound". But first just use it to make it more fat: Set the oscillators levels and pitches with Oscillator C set the same envelope and Coarse frequency as A and do the same with Oscillator D (same as B). This is quite a nice bass basic patch, isn't it?
More wooden sounds you get with raising the modulating Coarse Frequency (try 1 or 2), it will get bellish when it's too much. Play around with it again and play some notes on the keyboards lower end. Try changing the envelopes of that new C/D-branch. Also adjust the release rates where the deeper A-B branch should be the longer one (to keep it a bass sound). Now Set C and D Coarse to 1, so it will be 1 octave higher than your original bass branch on A and B. not bad, when you play and compare it to the one with no doubling? Set fine tune of Osc C and D to 8 or 16. Listen what happend! Now there is - The final first Bass, with "octaved" clone of itself slightly detuned from the other, use fine tune here -
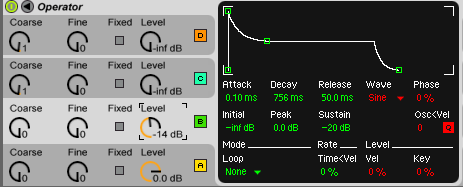
Here is how it ends up, the pitch of Oscillator B has been raised to have a brighter sound "more accoustic":
Operator FM Bass patch Ableton live Of course you could also set oscilator B to 1 and 992 to have it detuned from all other oscillators (negative detune). Since the "clone" bass on Oscillator C and D is one octave above the older A-B combination detune helps to let the sound "float"..
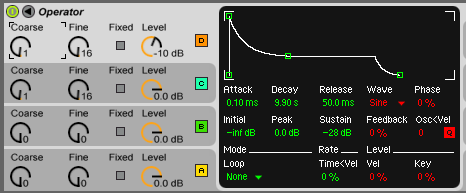
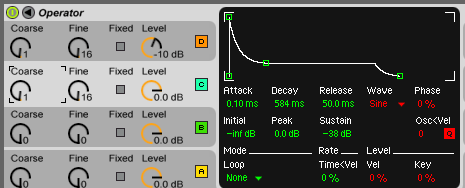
Here's the Oscillator C envelope setting:
Operator FM Bass patch Ableton live
You still have to play that bass on the lowest part of your keyboard.. so why not tuning the whole patch down.
to make more room, change transpose to -12 to have one more octave left on the low end.
The first real patch is ready now. The trick here is to double the sound using that second branch, you can still check how it sounds by muting the Oscillators (click the D and C symbol to mute just the newer branch of our algorithm)
A bass is normally monophonic! So set the number of voices to 1. You can find it where the algorithms are: click on the right lowest grey field to see it. To make the accoustic basses and some synth basses glide click on the grey area above (where the pitch,spread and transpose knobs are) to see the pitch menu. click the red G and set the time and play! now you hear the sound gliding to the next note you play. try longer distances between the notes!
bigger 3
Get it more big again..
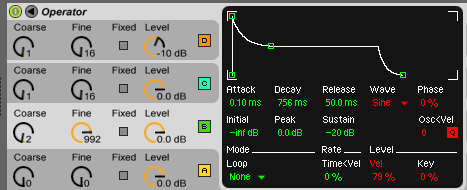
here's another trick to widen the sound: set the algorithm to Parallel configuration of some Oscillators like this: 4 OP FM Algorithm The trick here is to use the new structure for detuning 3 Oscillators instead of 2 branches. Note that your previous settings on Oscillator B now became a so called Carrier, it affects the volume, same for Oscillator C, which is still another Oscillator whose envelope will also shape THIS oscillators volume.. Note that Oscillator D now influences ALL oscillators below it! Changing modulation frequencies will change the sound radically! Try it to get an impression! always play when you change the parameters and come back to the setting shown here after all: if you keep all settings from the previous example you can set Coarse frequency of Oscillator B to "2 " and fine to" 992" (negative Detune). to give the sound more dynamics lets go a little further and set Level VEL of Envelope B to 79 shown here (it's red): (and set glide to off again for the following examples..)
Operator FM Bass patch Ableton live As a result you got 3 Oscillators that are at least one octave apart from each other, this makes the sound richer , at least you can detune them more try fine tune of each oscillator exept D (which modulates a,b and c)!
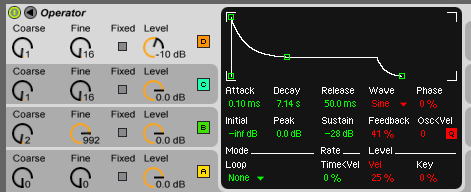
Now you can tune the sound to be more modern and less "accoustic"? First: Still add more dynamics! chance Operator A Velocity settings as follows:
Operator FM Bass patch Ableton live You have raised feedback, which adds more noise to the Oscillator (maximum will result in almost pure white noise) and the velocity response of this envelope is also set to 25% here. Now play a nice typical FM bass..
The sound can be tweaked to you likes. More accoustic "plucked stringish"? Set the frequencies of D to 0 and C to 20.
Play with different settings, shorten the decay phase of the envelopes to hear it's effect to make it longer less percussive or shorten it to get a short blip bass, since you set the new frequencies you can set the "stringish" sound to be longer or shorter when the key is released: thats the release value on each envelope!
if you want a quick change try the "time" and "tone" knobs , they will change the harmonics and envelope times!
more electronic 4
Want it more electronic and at least still "add more depth and phatness":
Set the oscillators exept the modulating ones to Square32 or Saw32 with high rich sound (note: you still have them set to sine waves that have no overtones at all!) The waveform can be found under the corresponding envelope in red (reading "sine" at the moment) , click on it and set oscillators A and B to SW32 (thats a sawtooth wave and listen!)
Now it's time to use the Filter to remove some frequencies and overtones that do not sound much like a synth bass now: Switch it on (click the box on the right under the word "Filter" on and set it's envelope and experiment after setting the red Envelope Amount Parameter to 80 or more and the (red) Freq/Vel Parameter for influence of velocity on the filter. the "plucked string" Oscillator C should be set back to 3 now, we want it less accoustic, right?
It should look like this exept the Resonance (ignore tone and time setting!)
Operator FM Bass patch Ableton live The more resonance, the more "electronic" it will sound. The envelopes on the left should always be longer (decay!) than the filter envelope since the filter reduces the overtones above the cutoff frequency. Resonance will amplifiy everything around the cutoff frequency! thats the one you control with the envelope and the more resonance you add the more "unreal" it will sound Try different settings of cutoff and resonance and chance the envelope shape, eg. you could add some attack which is the time from "initial" level to maximum (peak)..
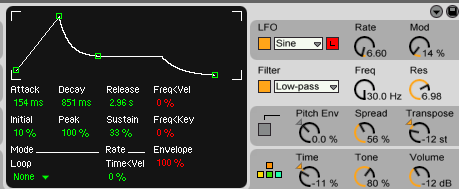
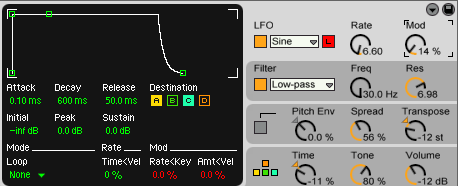
Now it's time to get the maximum of the synth engine and liven up the sound once more, for this experiment simply turn down the Resonance a bit and click on LFO above the filter. it can be seen as another Oscillator, set it's rate to 6.60 and "Mod" (amount of Modulation) up to around 14%. Set the destinations to some of the 3 carrier oscillators, choose A and C (they are inverted when active) like this:
Operator FM Bass patch Ableton live
Congratulations! Now you got an idea of what Operator can sound like! You can also learn about basses by simply choosing some of the bass presets and watch how they have been made. Feel always free to experiment! there are a lot of sounds to expore..
--- Moogulator.com - 18:58, 26 November 2007 (CET)
Old Link: [1]
